

What is ‘Ease’?
Ease is a term most commonly found in the fashion and dressmaking industries. The following is a definition in one of my fashion drafting text books …
Ease is the difference between the body measurements and the measurements of the garment at a given point, as provided by the designer. …
Patterns are cut to include three kinds of ease.
- Body or wearing ease – which allows movement and comfort; without it, the garment would be skin tight.
- Style or design Ease – determines the individual characteristics of a particular design, that is, the silhouette, look and fit that the designer intended and this varies from style to style.
- Layered ease – which is built-in when garments are designed to be worn over other garments, that is, jackets, coats etc.
“Figure Analysis” by Pat Fernon
Put simply, ease is a small extra amount added to the measurement of a pattern.
In the craft industry, ease isn’t something we need to particularly focus on, especially those of us designing and making things such as soft toys. However, some pattern templates will naturally have an area where we are left trying to fit two pieces of different lengths or shapes together.
In this tutorial I will show you how to work with ease and some tips on avoiding those annoying tucks and pleats that can happen.
I will be using two examples to demonstrate how to sew with ease, first a straight seam to demonstrate the basics of how it works.

Even though there is a 1cm (.4 inch) difference between my two samples, it is possible to stitch them together without gathering the longer piece. Here’s how …
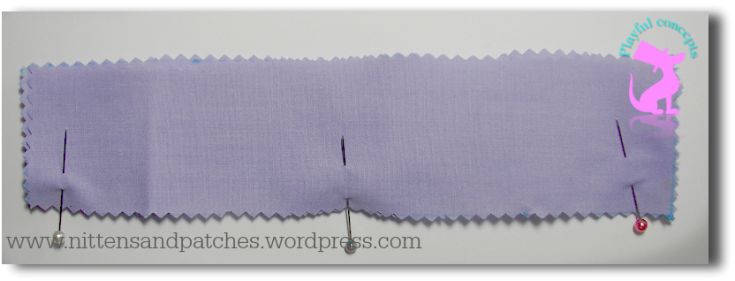
Start by pinning the two pieces together at each end. Because this is just a short piece, I have only pinned it once more in the centre, for a longer piece I would pin it every few centimetres.

At your sewing machine, place the longer piece on the bottom. By doing this, the action of the ‘feed dogs’ on your machine will gently ‘take up the slack’ in the fabric as you stitch. If there is only a small difference in the length, you should be able to stitch this without getting any tucks or pleats in the bottom piece. (If you do, up-pick a section either side and re-stitch).

As you can see in the second image above, (long piece), there is a very slight crinkling on the fabric, but along the stitch line, it is still flat with only slight puckering, but no pleats or tucks in the fabric.

Joining two pieces with concave and convex curves is one of my least favourite things to sew, especially in woven fabric (stretch fabrics like fleece are much more forgiving). But it can be a surprisingly common join in many sewing projects.
When we look at these to pattern templates, it looks as though they would never go together. The ‘face’ template looks much too big. But they do, and I will show you just how well they can fit together in the next demonstration.
(psst … the templates I am using are from a brand new pattern I am working on, it will be part of a four piece set of patterns 😉 )
To begin, I pin these together where the notches are marked – ‘E’ and ‘F’, then at the midpoint between the notches, and then wherever I feel I need to to spread the fabric evenly along the stitchline. You can see already that these two pieces are actually the same length, but while the ‘convex’ side is sitting nice and flat, the ‘concave’ side has lots of nice big folds.

Unlike the first example, I personally feel more comfortable stitching this type of ease, with the ease side up — the concave curve. It can be a little more tricky to work the fabric in evenly, but I can see what is going on with the fabric and maneuver it as I need to to avoid getting any tucks or pleats in my seam. Extra pinning is very handy here as I can ensure the fabric has been spread out across the whole seam before I begin.
Keep in mind when you are sewing something with ease, you only need to have the stitch line flat. I’ll show you what I mean in this next photo.

If you look closely at the area where the needle enters the fabric, you will see there is a big fold right up to the needle, but where the needle hits the fabric it’s flat. This means the stitch line is nice and smooth, and there is a slight fullness in the fabric similar to what we could see in the first example.

You can see the fullness on the concave curve on the first two images, but when it is pressed, much of that vanishes. I have pressed the seams towards the convex seam, this helps it all to sit nicely. I haven’t clipped my seam allowance in this sample, but if I was using a bulky fabric, cutting notches in the convex curve would be needed to reduce the bulk and maintain a nice smooth seam. If I had used something like fleece or Minky, because of the flexibility of the fabric, I wouldn’t had to press at all — I think this is why fleece and Minky are so popular with soft toy makers 😉
Well, there you have it, not so scary or hard after all.
If you have any questions about this tutorial, please leave them in the comments below 🙂
Are there any other sewing techniques you would like me to demonstrate? Let me know in the comments section. Until next time … 🙂


Comments